
Publisher
veryseriouscatrelate
Scene Builder Level Design 3D
A level design system for efficiently building 3D scenes in Godot. Please see the README in the GitHub repository for more information. The version in the Asset Library will likely lag behind the GitHub repository, I recommend installing SceneBuilder as a submodule, then manage updates with Git.
This plugin has been mirrored from the Godot Asset Library.
The plugin author is in no way affiliated with Gadget.
If you are the author of this plugin and would like this mirror removed, please contact support@gadgetgodot.com.

Scene Build & Productivity Commands for Godot 4.4+
Scene Builder is a 3D level design tool and asset browser for Godot 4.4+, together with a set of common productivity commands.
The latest version can be downloaded here on GitHub, but you may also find release versions on Itch.io or in the Godot Asset Library.
[!IMPORTANT] Since I use this tool for my own games, any form of collaboration, bug reports, or new feature suggestions are greatly appreciated. Please join us in Discord, or make a post in Github's Issue's section if you would like to help out.
Documentation
Quick Start Video Guide
Scope
Scene builder is made to serve as a scene browser and scene placer for scenes of type Node3D. Scene builder also aims to offer a handful of productivity commands. Scenes may only be placed on collision shapes.
Compatibility
Scene builder should work with any type of collider, such those generated by CSG Tools or Terrain3D-- just make sure that the colliders have been generated during editor time.
Multi-Mesh Instances
Scattering large numbers of objects, often with help from multi-mesh instances, is currently out of scope. Please see one of the specialized tools below,
- Terrain3D has its own built-in pipelines for vegetation and instanced objects, and a new particle grass feature as well.
- Scatter is a powerful tool designed to randomly fill areas with props or other scenes.
- Simple Grass Textured is the perfect tool for painting 2d textures over a collision area.
- Spatial Gardener is an efficient tool that uses an octree to scatter plants or props over arbitrary (possibly large) surfaces.
Grid Snapping
Grid snapping is included, see the section on snapping for more information.
[!TIP] GridMap is a fantastic tool built directly into Godot. GridMap offers different features and may be worth considering for your project.
Installation
In addition to being available in the AssetLib, Scene builder may be installed by simply cloning the entire repo into,
res://addons/scene_builder/
which means that a recursive directory pattern will exist,
res://addons/scene_builder/addons/scene_builder/
[!NOTE] Implementation details: Scene builder is logically divided into two main parts: scene builder commands and the scene builder dock. The script
scene_builder_commands.gdadds commands to the Godot toolbar (Project > Tools) and listens for keyboard shortcuts. Each command's implementation is contained within the command's respective GDScript file, located inaddons/scene_builder/Commands/. In the other hand, we havescene_builder_dock.gd, which handles logic for the interactable scene builder dock.
Configuration
Scene Builder's behavior can be customized through the configuration file at res://addons/scene_builder/scene_builder_config.tres:
Shortcuts
With an item selected in the dock,
Placement Mode Shortcuts
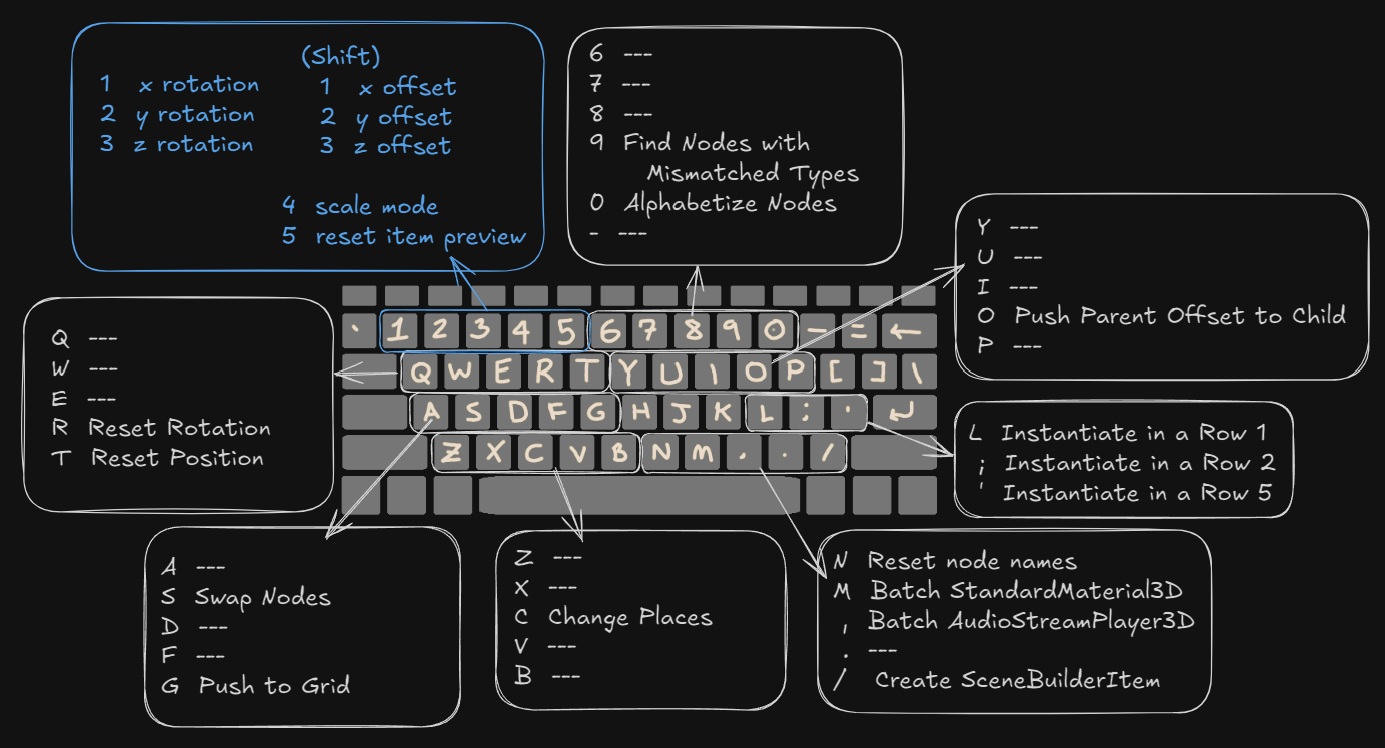
- Enter x rotation mode: 1
- Enter y rotation mode: 2
- Enter z rotation mode: 3
- Enter x offset mode: Shift + 1
- Enter y offset mode: Shift + 2
- Enter z offset mode: Shift + 3
- Enter scale mode: 4
- Reset orientation: 5
- Rotate by +/- 90 degrees:
[and] - Select previous/next items by pressing: Shift + Left/Right Arrow
- Select previous/next category by pressing: Alt + Left/Right Arrow
- Exit placement mode: Escape
Navigation Shortcuts
- Select children: Ctrl + Right Arrow
- Select parents: Ctrl + Left Arrow
- Right-click an item icon to quick-access its resource file
The Alt Key
SceneBuilder commands all require the Alt key pressed for activation. Although Godot generally doesn't make use of the Alt key, it does conflict in a few cases. To keep things simple, I simply move Godot's shortcut somewhere else. Shortcuts are still in progress-- new commands are still being added.
To update default shortcuts, edit the resource scene_builder_config.tres, then reload the project.
[!CAUTION] Some default shortcuts for scene builder will likely conflict with Godot's default shortcuts. Scene builder's shortcuts may be updated by changing the values in the resource file:
addons/scene_builder/scene_builder_config.tres, then reloading the project. Godot's shortcuts can be updated in the toolbar,Editor > Editor Settings... > Shortcuts.
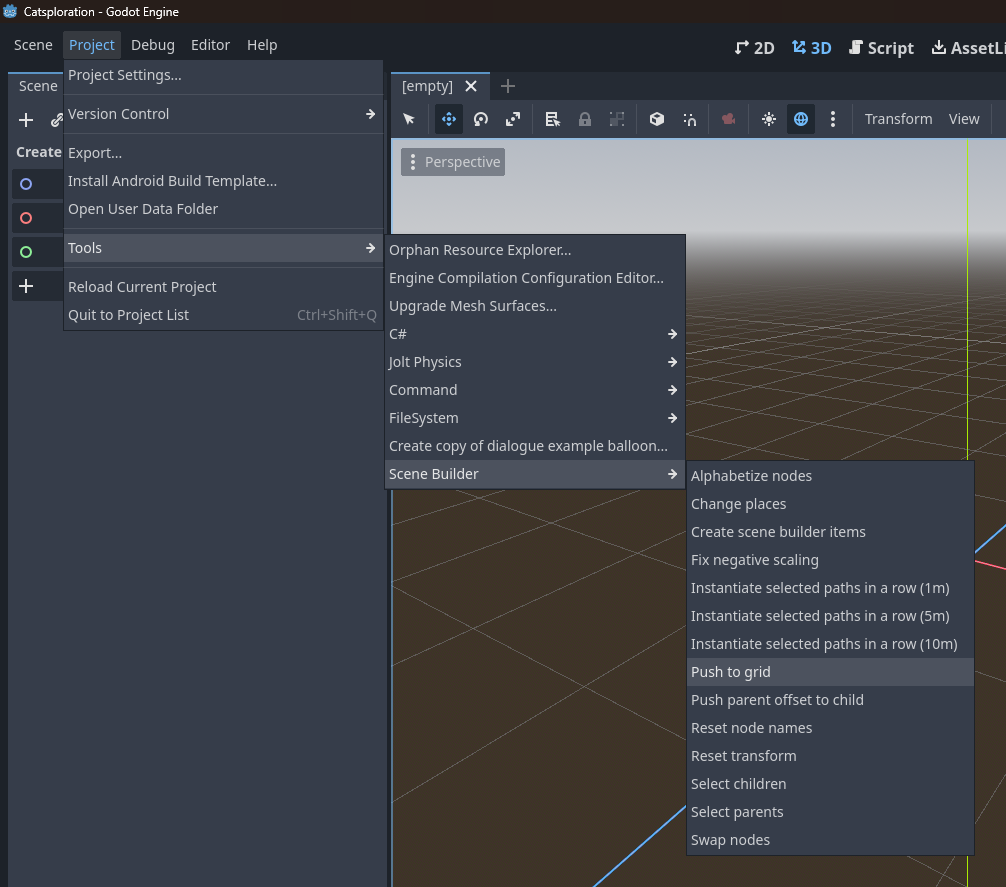
We can also access commands from the menu, as is shown here,
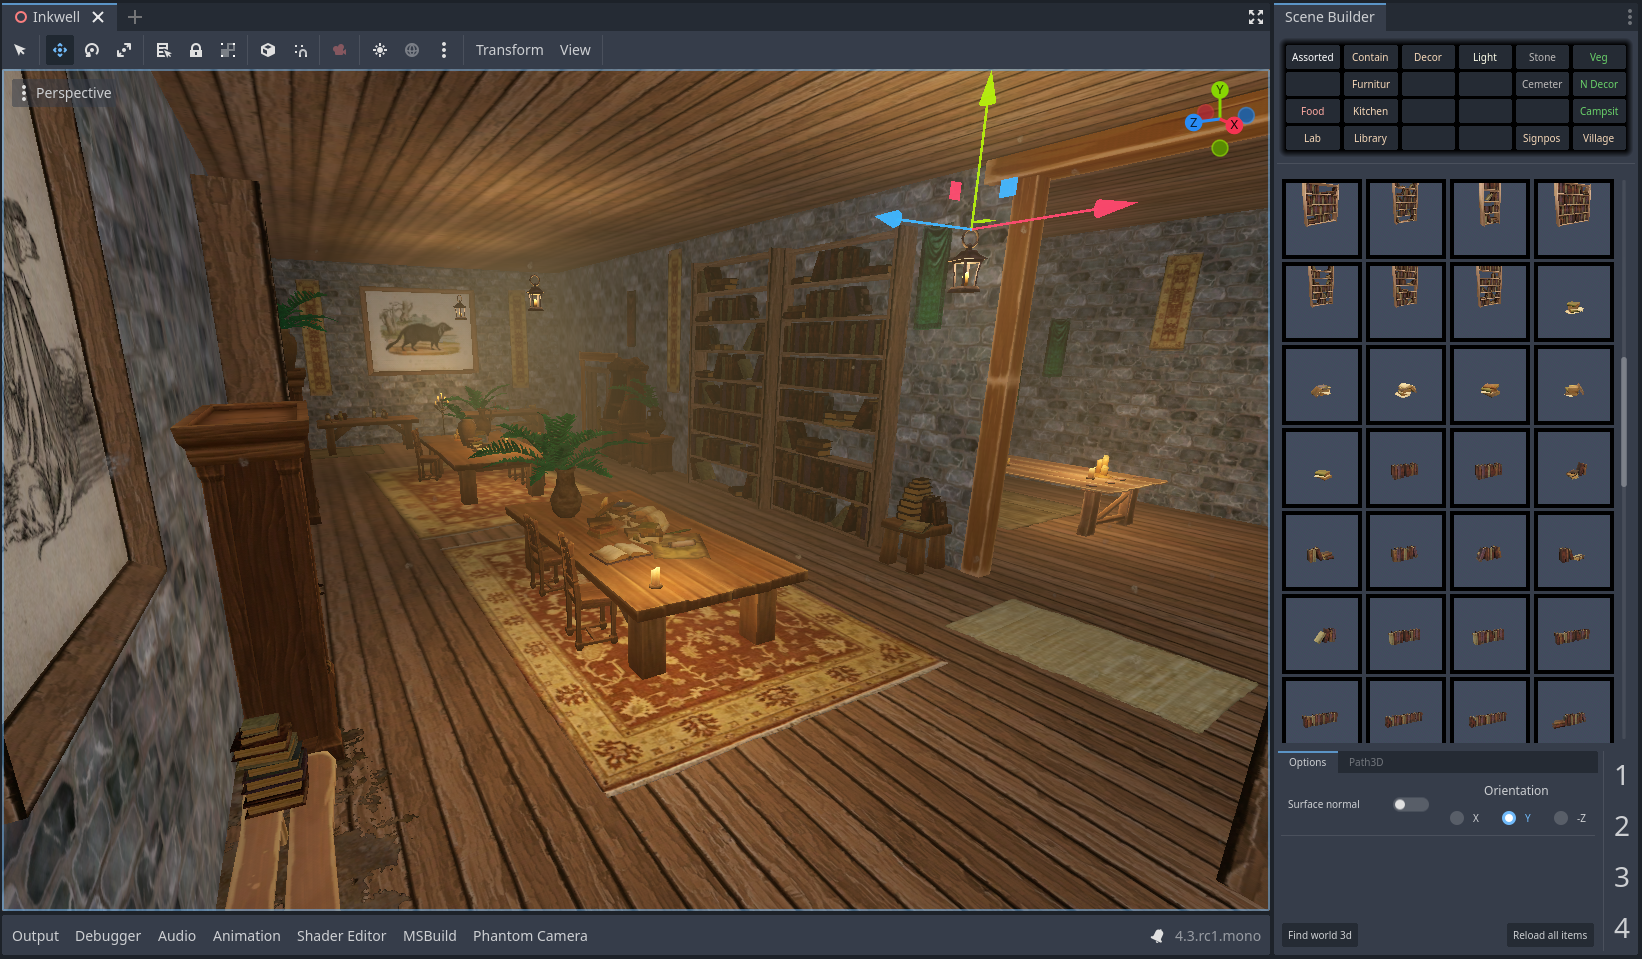
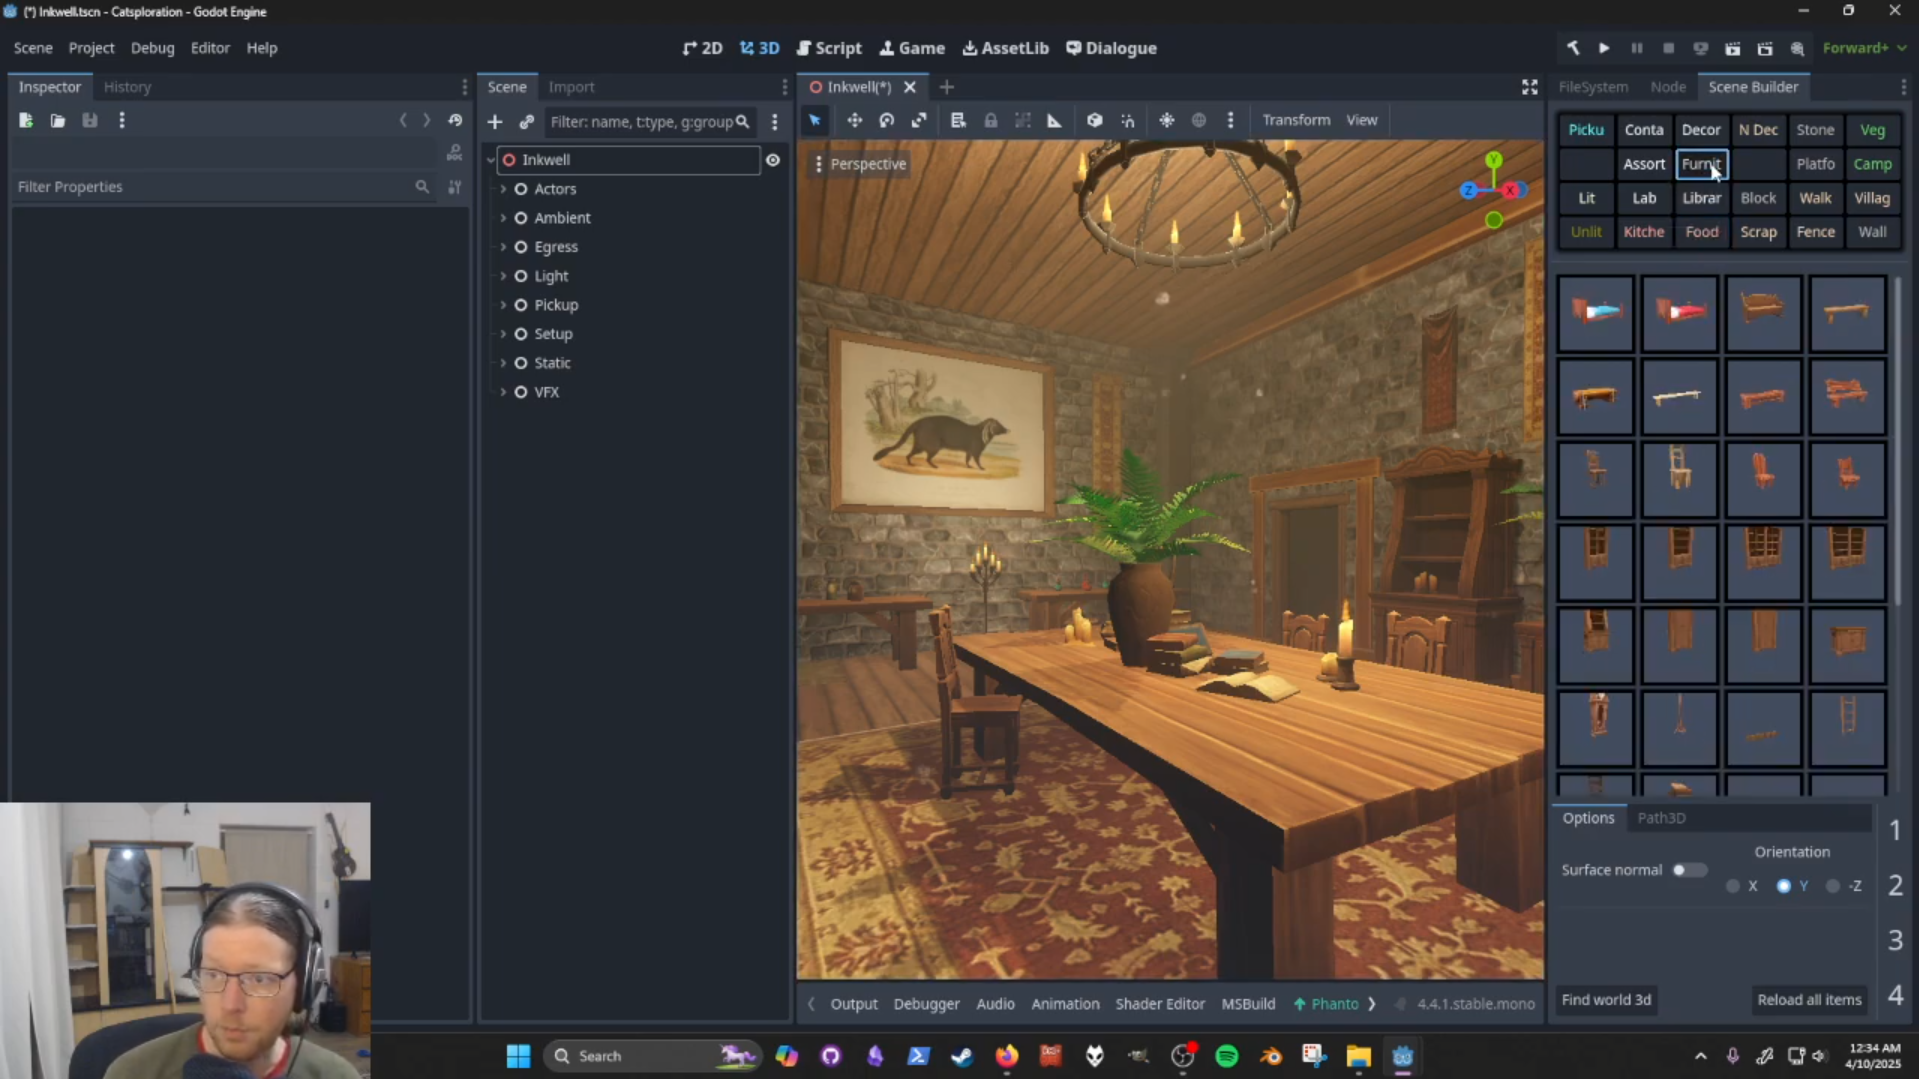
The Scene Builder Dock
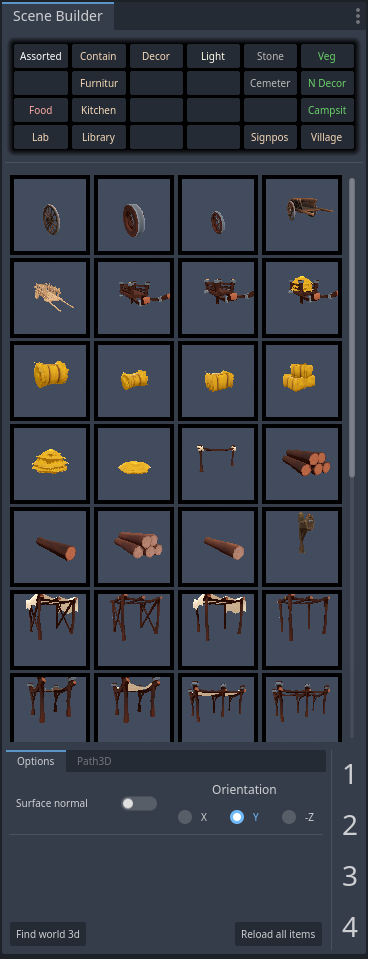
Setting Up The Dock
By default, our data directory is located here: res://Data/SceneBuilderCollections/. You may change this in the configuration file.
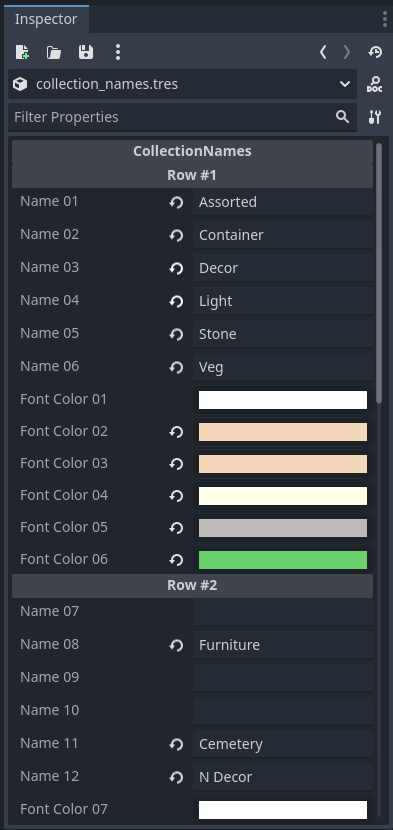
- Enter your desired collection names into the CollectionNames resource. Empty folders with matching names will be created, if they do not already exist.
The dock is populated from SceneBuilderItem resources located in these folders.
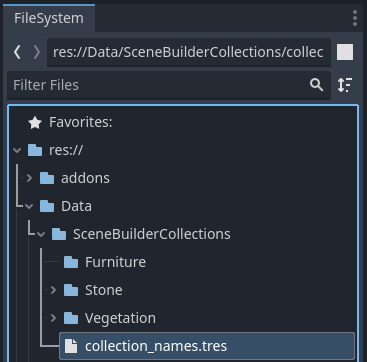
If you have a folder in res://Data/SceneBuilderCollections/ that is not listed in the CollectionNames resource, then it will simply be ignored. Conversely, if a collection name is written in CollectionNames, then a harmless error will occur if a matching folder is not found.
The scene builder dock only provides space for 18 collections, however, you can make additional folders. We can update which 18 collections are currently in use by swapping out names in the CollectionNames resource, then hitting the "Reload all items" button on the scene builder dock.
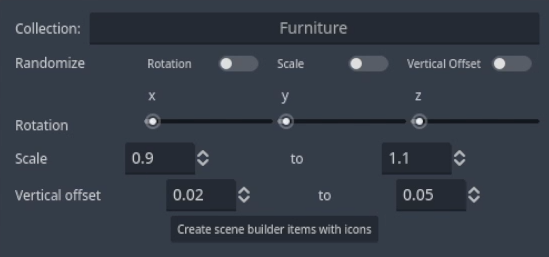
We can enable the plugin now to preview collection names in the dock. Since our collection folders are empty, you will see a harmless error: Directory exists, but contains no items: Furniture.
Scene Builder Items
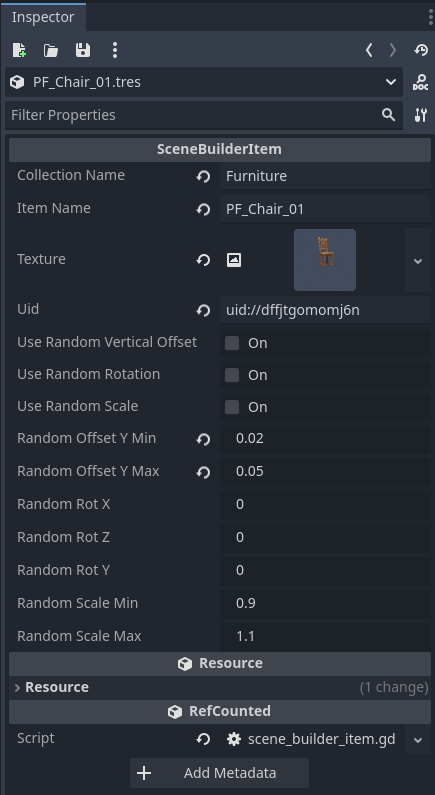
To create an item resource,
- Select one or more paths in FileSystem that contain an imported scene with a root node that derives from type Node3D.
- Run the "Create scene builder items" command by going to Project > Tools > Scene Builder > Create scene builder items, or by pressing the keyboard shortcut
Alt + / - Fill out the fields in the popup window, then hit okay.
- After pressing okay, the
icon_studioscene will be opened. Please close the scene when it's done without saving changes to icon_studio.tscn. However, if you would like to make changes to icon_studio.tscn, then that's a great way to customize your icons. - In the scene builder dock, click the button "Reload all items"
Update the Scene Builder Dock
Find World3D
The scene builder dock needs to know which scene it should be placing items into. Since this is typically done automatically, this button is usually not needed.
Reload All Items
Whenever we make changes to SceneBuilderItem resources or collection names, we must then press the "Reload all items" button on the scene builder dock.
Placement Mode
When an icon is highlighted green in the scene builder dock, then placement mode has been enabled.
To exit placement mode, we may click the highlighted icon or press the escape key.
When placement mode is active, an item preview is created in the current edited scene. The preview node will have a parent node named "SceneBuilderTemp." We may safely delete this node when we are done, while the item preview node will be automatically clear when exiting placement mode.
Parent Node Selection
By default, new items are instantiated as children of the scene root. Use the parent node selector to:
- Drag and drop a node from the scene tree to set it as the parent
- Click the button to clear selection and return to scene root
- Enable "Force Root" to always use the scene root regardless of selection
Use Surface Normal
Instantiated items will align their Y axis with the specified orientation when the checkbox "Surface normal" is toggled on.
Due to gimbal lock, you may notice that the preview item will often acquire orientations with undesired offsets. Press 5 to reset the item preview's orientation.
Rotation Mode
Press 1, 2, or, 3 to enter rotation mode, where these digits represents the x, y, and z-axis respectively. When rotation mode is enabled, the corresponding digit will be highlighted in the bottom right of the scene builder dock.
Rotation is applied through mouse movement (proportional to the mouse motion's greatest relative value in the x or y axis)
Rotation will be applied in local or world space according to the "Use Local Space" button in Godot's 3D toolbar.
To exit rotation mode: left click to apply the rotation or right-click to cancel and restore the original rotation.
Scale Mode
Press 4 to enter scale mode.
Scale mode works similarly to rotation mode.
To exit scale mode: left click to apply or right-click to cancel and restore the original values.
Snap Mode
Snapping only works in world space.
[!NOTE] Snapping is disabled when "Use Local Space" is enabled in Godot's 3D toolbar.
Grid Size
When Snap is enabled, the Translation, Rotation, and Scale settings used.
Plane Mode
Enable plane mode to place objects on an invisible horizontal plane:
- Y Position - Set the height of the placement plane
- Interaction Modes:
- Prefer Colliders - Use colliders when available, fall back to plane
- Closest Wins - Use whichever surface (collider or plane) is closer
- Ignore Colliders - Always use the plane, ignore collision surfaces
Path3D Mode
Scene Builder can automatically place items along Path3D curves.
This feature was designed with fences in mind, but it might be useful in other ways. To use,
- Select a Path3D node in your scene
- Choose a collection with fence-like items of equal width
- Configure placement settings:
- Separation Distance - Spacing between placed items
- Jitter - Random rotation variance on X, Y, Z axes
- Y-Offset - Additional rotation around the path direction
- Click "Place Fence" to populate the path
- (Optional) Once the items have been instantiated, you can delete the Path3D
Contributors
Scene Builder is made by Paul Hill, with help from contributions, who can be found here.
The icon was made by Hano.
License
Licensed under the MIT license, see LICENSE for more information.